
Welcome back to the third and final part of our chatbot mini-series. If you missed our previous articles and want to know more about the chatbot landscape and their relevance in today’s markets, you can find Part I here.
If you’re more interested in understanding how they work or just building your own, this article is for you! Be sure to take a look at Part II first though, where we started doing just that, focusing on the Natural Language Understanding (NLU) component.
In this article, we’ll build upon that work as we continue using IBM’s Watson Assistant to show you how you can have your chatbot reply and perform actions based on the user’s requests, by specifying a dialog tree.
Step 3: Dialog
In Part II we covered the first two steps of a chatbot’s request handling process. Now that we have a standard representation of the user’s request, we can assess how to best handle it. That is the dialog’s job: to take a standardised request and based on the information available and context of the conversation, decide what is the best next path to take, act upon it, and draw up which should be the chatbot’s response.
If you’ve been following along on our previous article and reproduced our examples on IBM’s Watson Assistant, you’ll have noticed that regardless of the intent being correctly understood or not, the bot would always respond with something like “Can you reword your statement? I’m not understanding.”
That’s because even though we’ve taught the NLU model how to recognise the user’s intentions, we haven’t specified how it should react to them, so we’re constantly falling into Watson’s default fallback response.
Let’s jump back to our test skill, and take a look at the Dialog tab in Watson:

Dialog works by allowing you to add multiple response nodes to the dialog tree, each with their specific conditions, and based on those and the tree’s structure, Watson will decide the best node to go into for each user input.
Currently, there are only the two default response nodes in there:
- Welcome: to greet the user when a conversation starts
- Anything else: the default fallback response that’s been generating the replies we’ve been seeing
For starters, we want our chatbot to respond properly to requests to turn things off, so let’s add a response node for that:
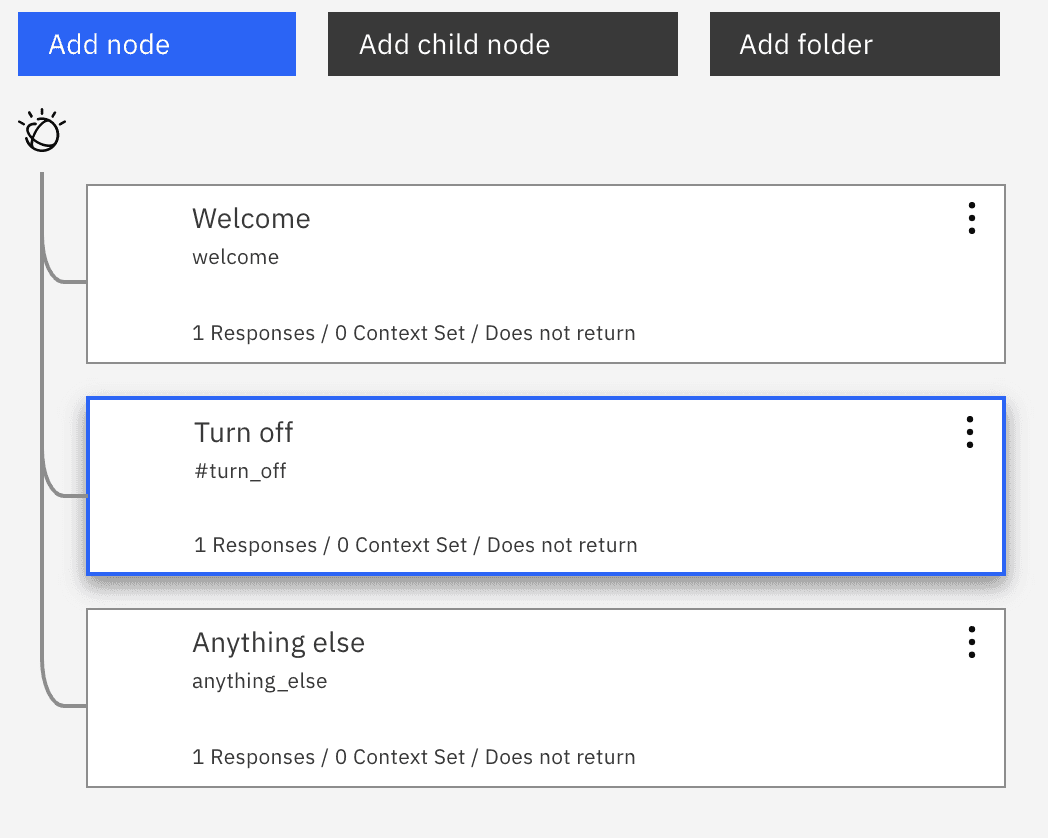
And let’s tell the service that we want this node’s logic to be triggered when we have a match for the
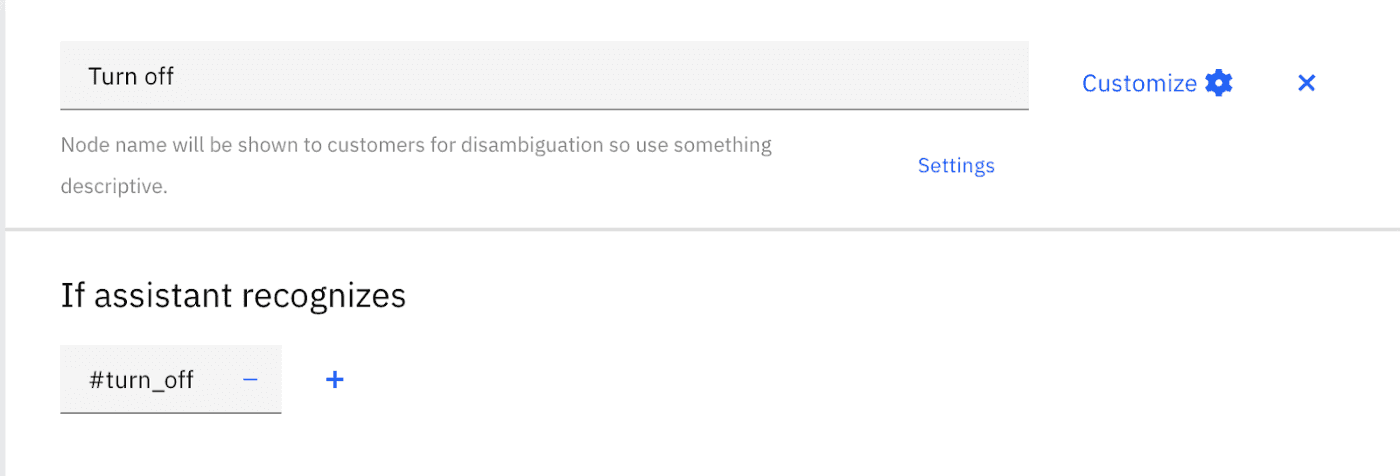
What we’re saying here, is that whenever the NLU’s best match is this intent, we want this node to be selected. Next, we specify what we want to reply to the user in this situation. For now, let’s just acknowledge the request back:
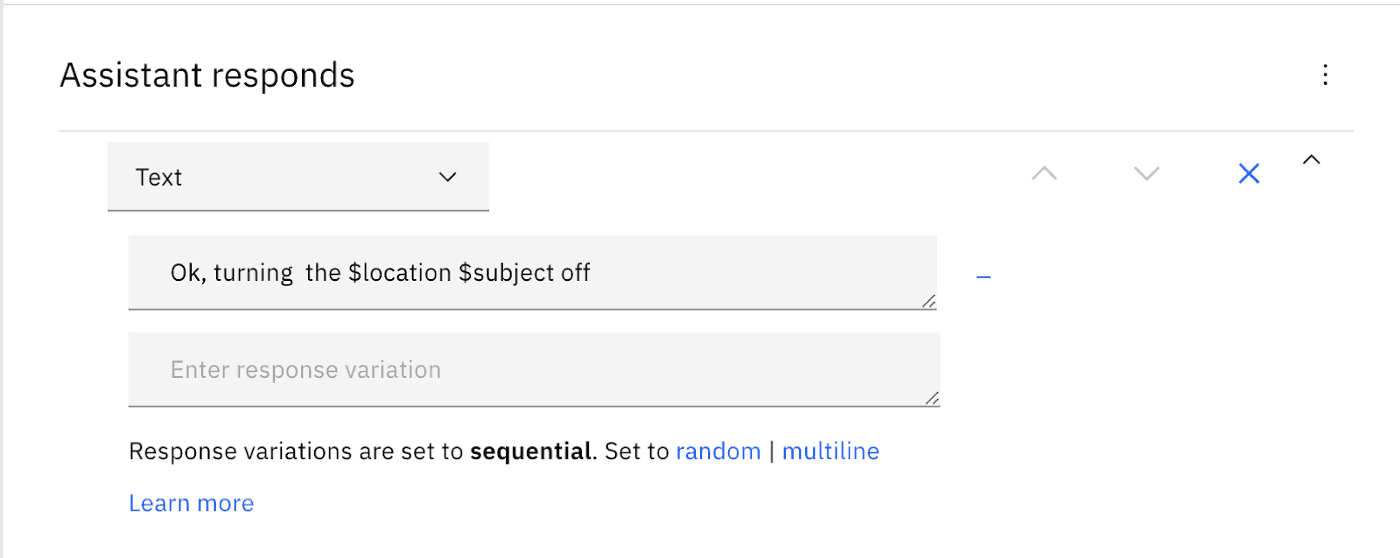
Let’s give that a go:
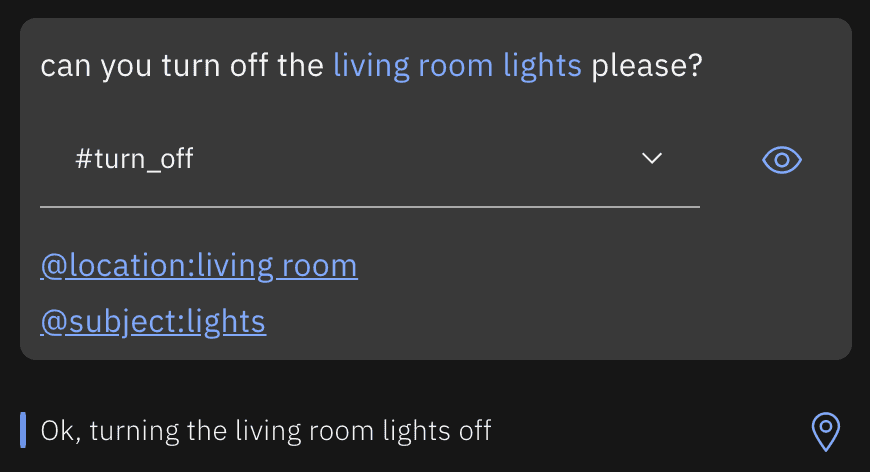
🎉 Cool, we’ve just taught our chatbot to answer these types of questions!
But where do the $location and $subject variables come from? What if they don’t exist?
We start by telling Watson that we want it to check for a subject and location in this request. To do this, we can take advantage of a feature of Watson called slots:
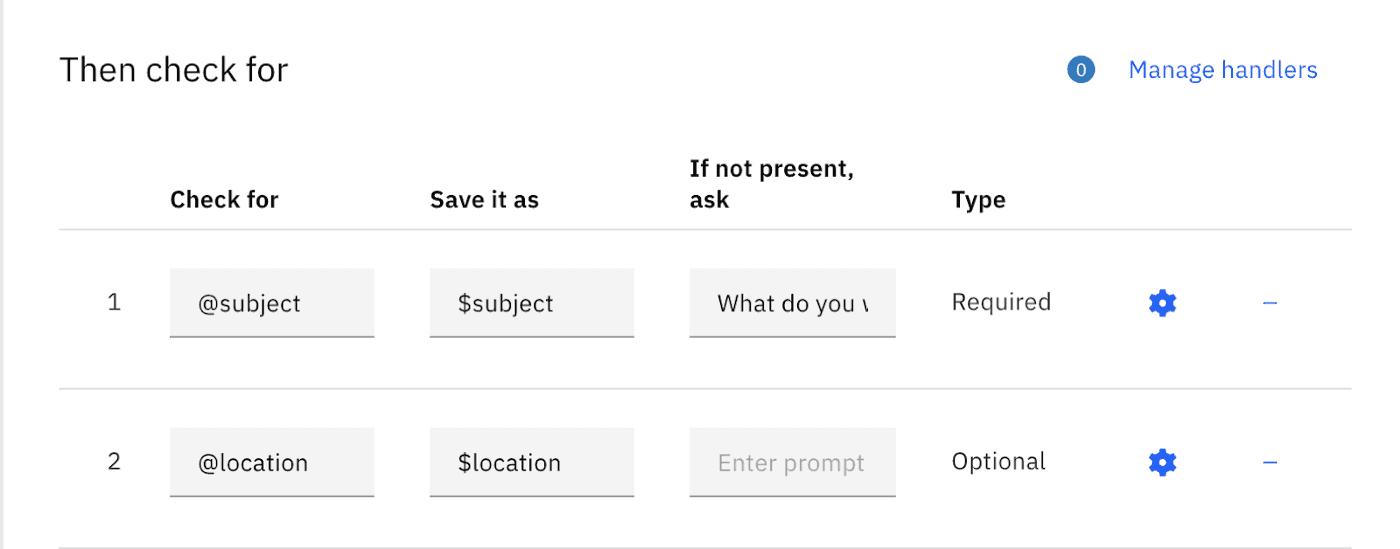
Slots are like saying “before I can complete what I want to do in this response, I want to check if certain properties are available already and if not, optionally ask for them”. In this example, we made the
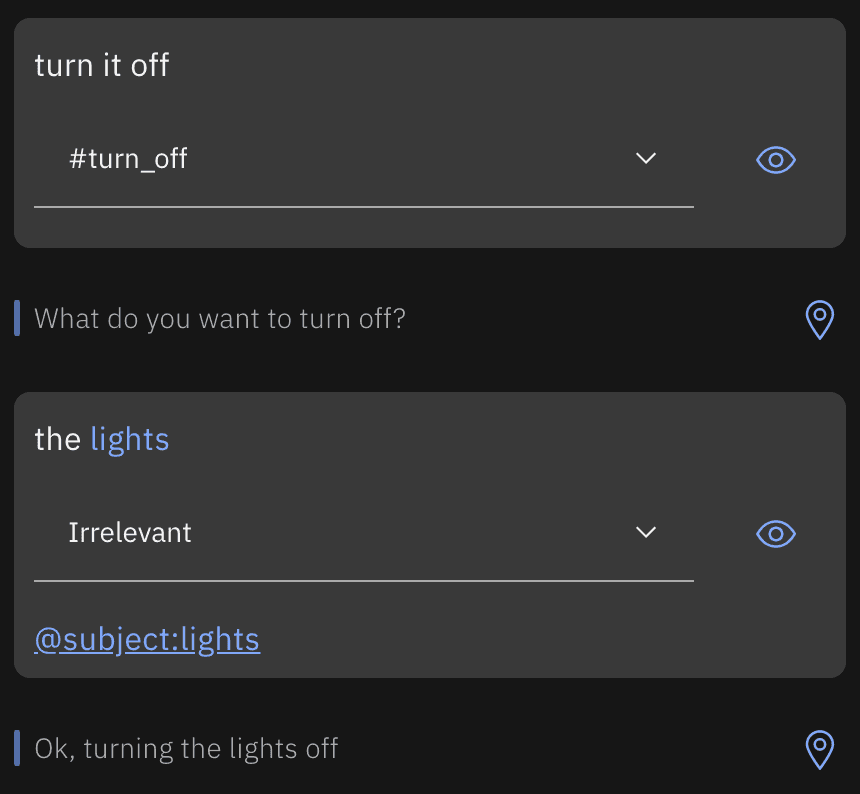
Since the user didn’t include information about what to turn off in the original sentence the chatbot enquired about it before proceeding. Once the user replies with the required information, the dialog is allowed to carry on and generate the expected response. It didn’t ask for a
One final thing we have to do is to clear the values of
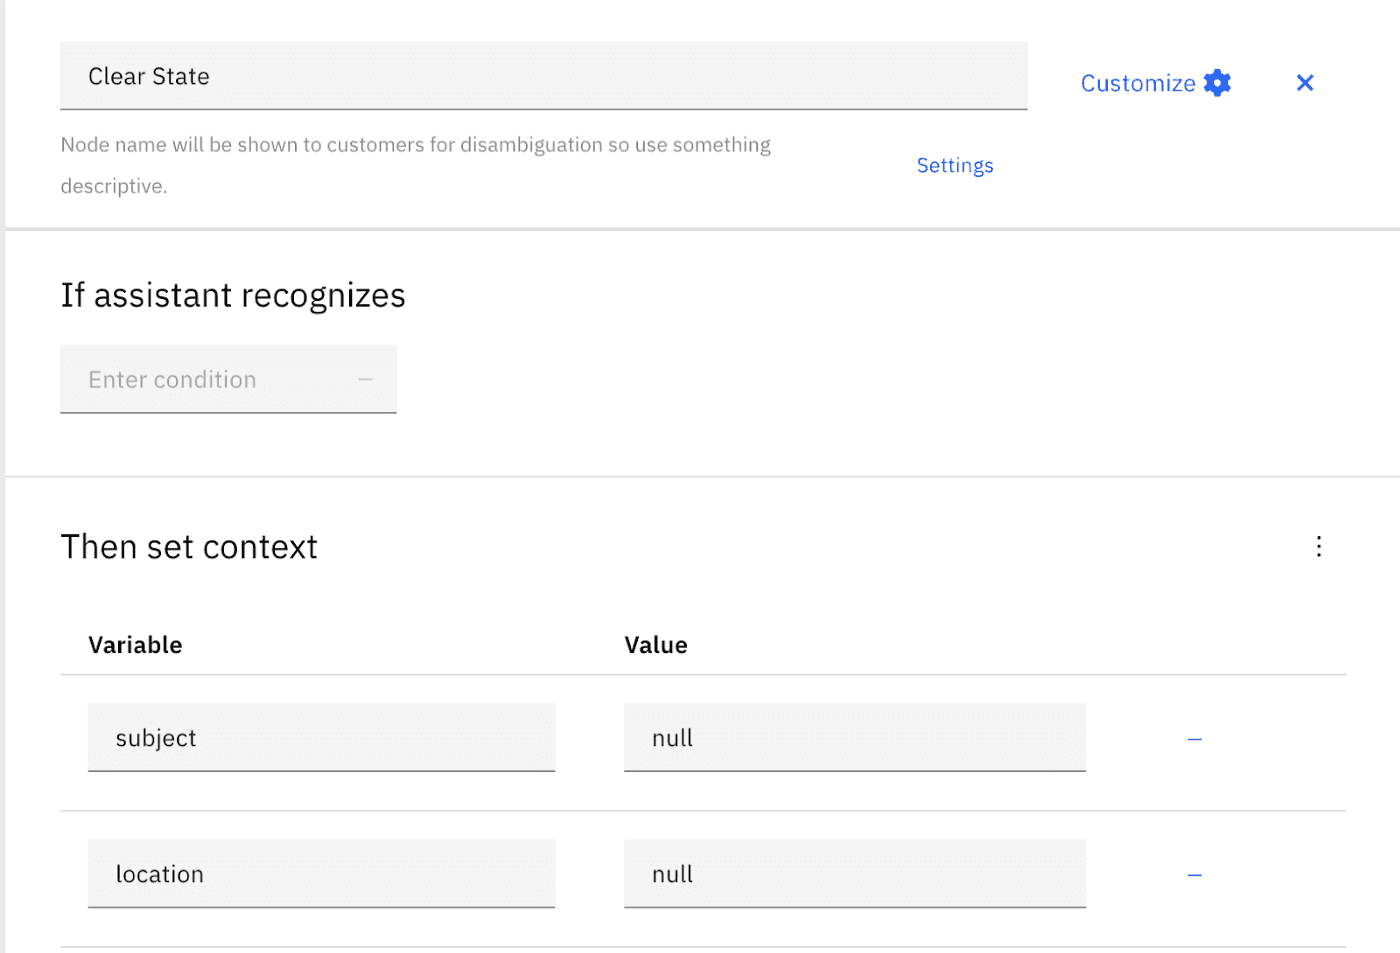
Notice that since we never want this to happen in direct response to a user’s input, we don’t set any condition for this node. Instead, we make sure our

Now that we’re done for
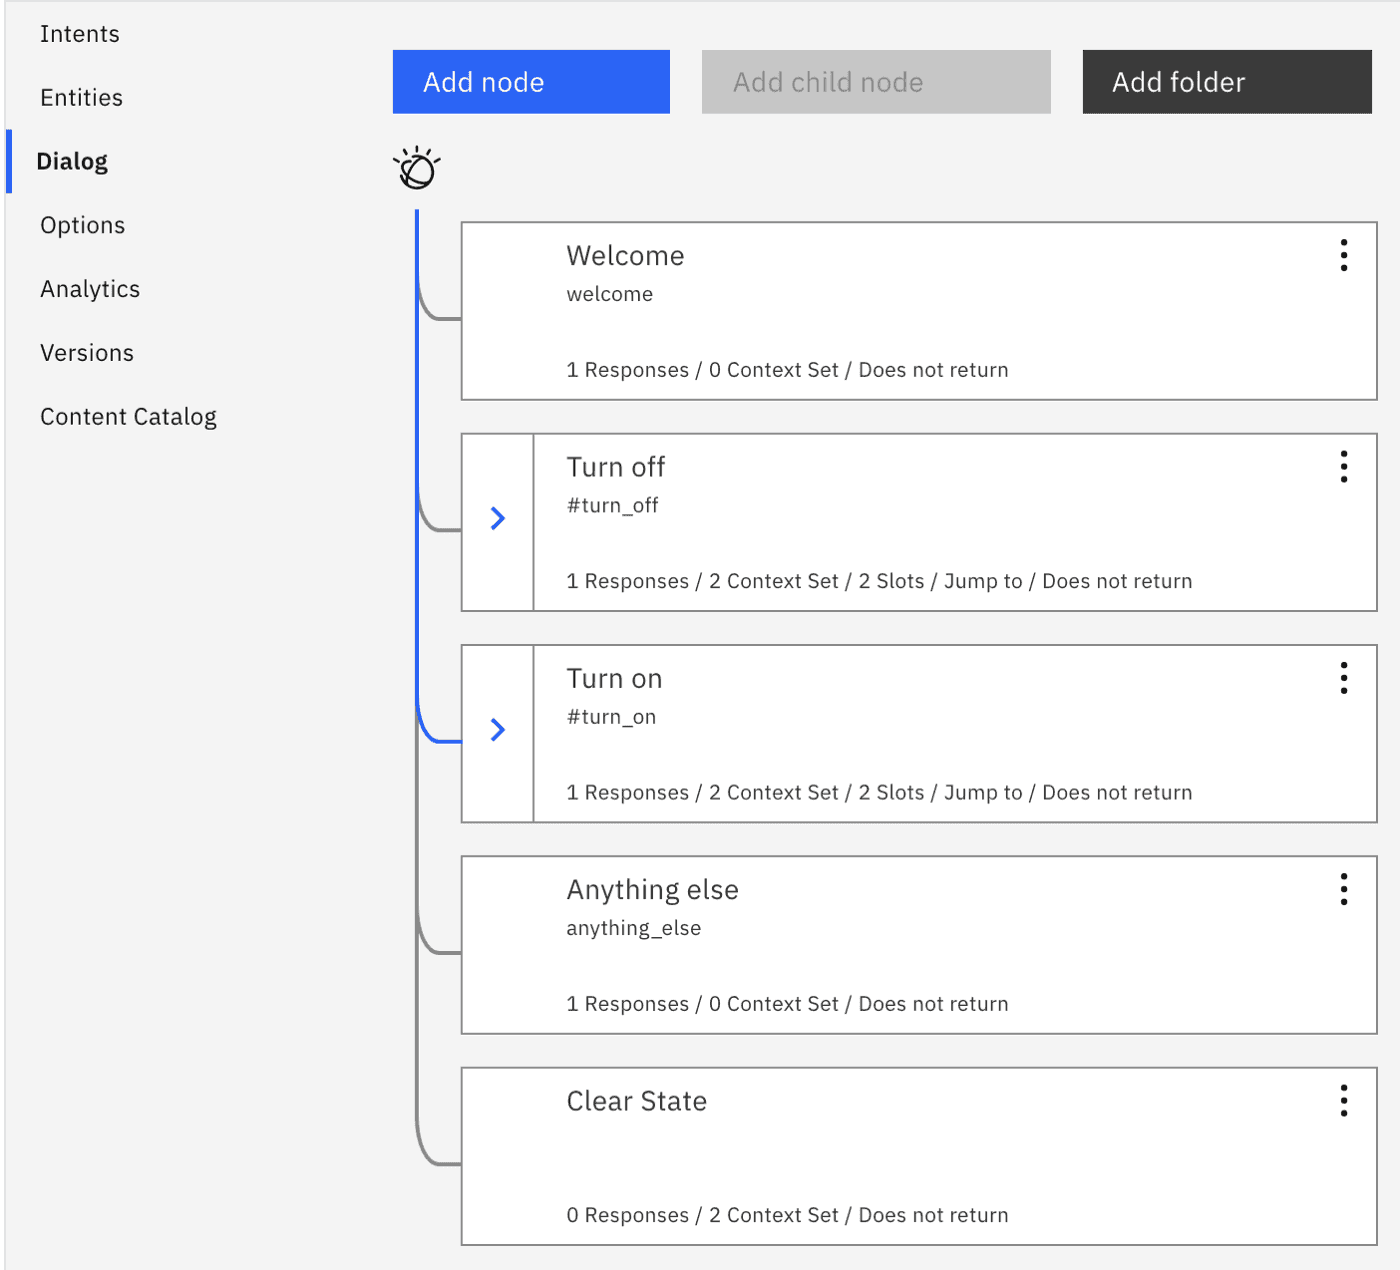
And there you have it. You got yourself a chatbot that can understand and respond to your commands to turn your smart lights on and off around the house 🤖
💡 Just one more thing…
There is one thing left though: how do you make the connection to an external service and make those actions happen for real?
To achieve this, the pseudo-code for our response should be something along these lines:
- Assess which are the lights located in the living room
- Dispatch a command to those devices to turn them off/on
- Based on the outcome (success/failure) decide the response to be sent back to the user
This means we need to be able to run a bit of custom logic and unfortunately we’ll need to do this outside of Watson Assistant. We need to implement the above logic in our server (or cloud function) and expose an endpoint for Watson to call whenever there’s work to be done.
First steps involve telling Watson that this chatbot needs to call an external endpoint, and what that endpoint is. We can do both from the node’s “Customization” settings when enabling Webhooks:

Tip: if you just want to test your chatbot quickly you can use a webhook testing tool like https://webhook.site/ to generate a unique endpoint and quickly set up a response
Once we enable webhooks on a response node, Watson automatically adds a Webhooks section to our node including the Parameters we want to send over to our endpoint, and the Return Variable to store its result. So let’s use those to pass the action, subject and location we need, and assign the result to the webhook_result_1 variable (note that this variable name should be unique):
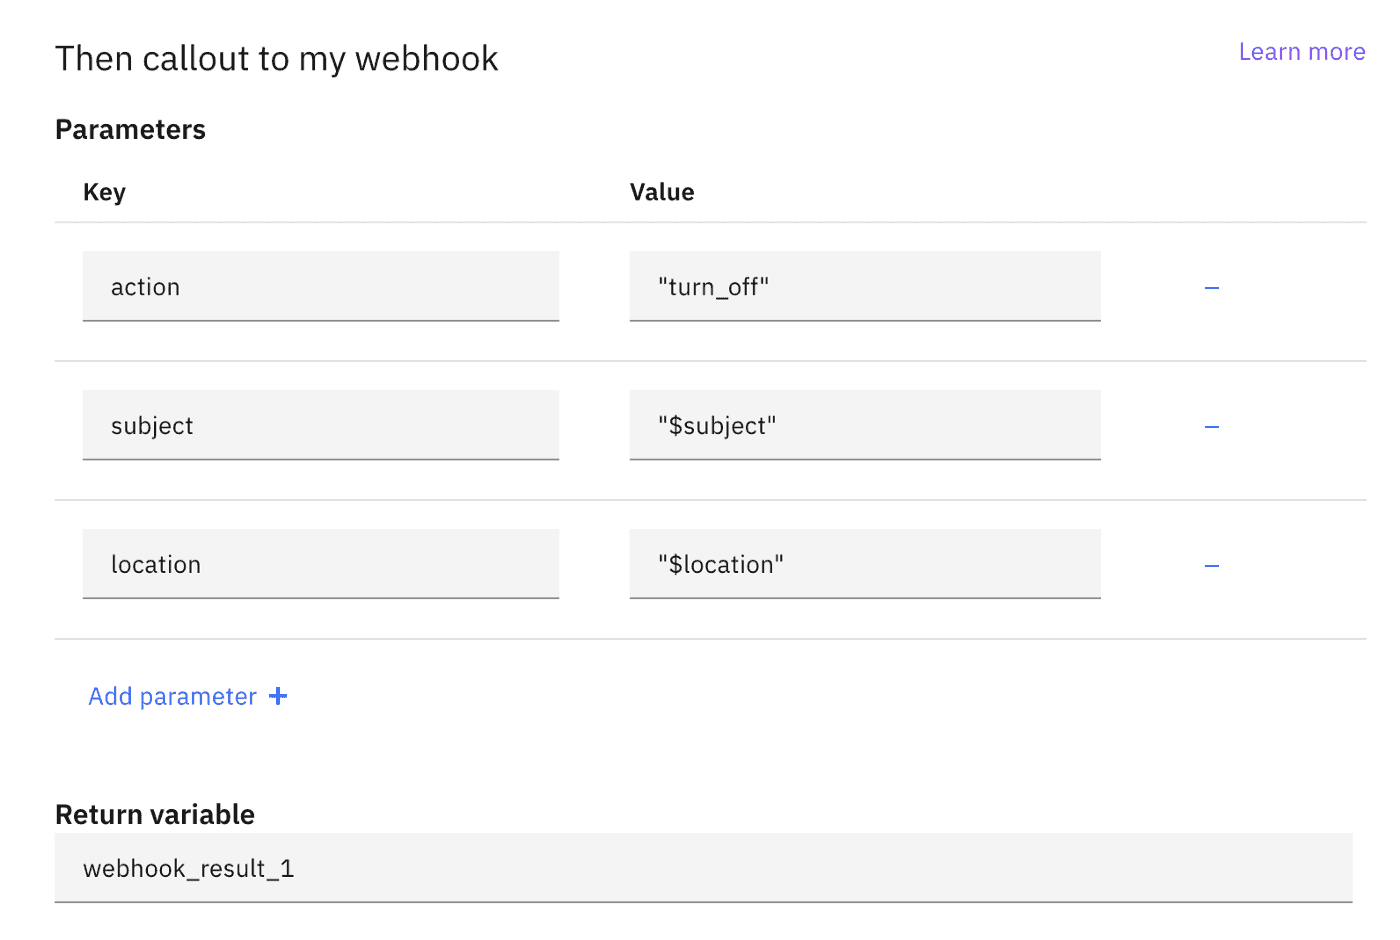
With this we have all we need to implement the above pseudo-code, so let’s assume our API’s return contract to be:
Our dialog only needs to know if the request was successful, so we set our conditional responses according to whether the success field is present on the response or not. This way, even if the request times out or fails for another reason, we’ll still send out the error response:
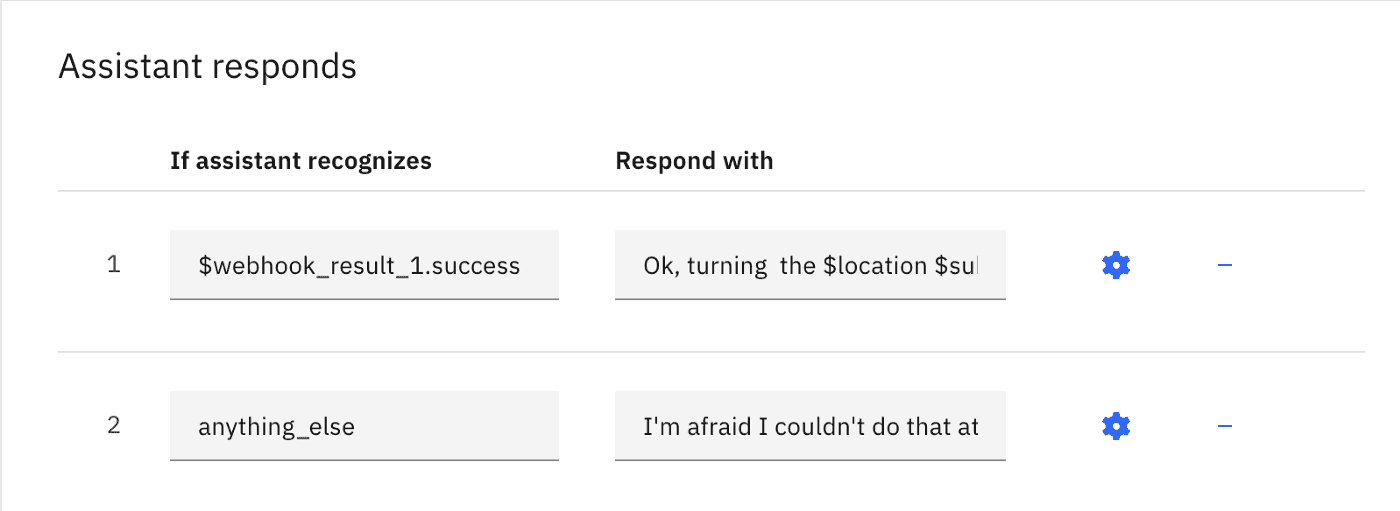
With this change, if the action succeeds, we just acknowledge the action to the user as before, but if it fails, we now let the user know it by responding with “I’m afraid I couldn’t do that at the moment”.
And we’re done! All that’s left is replicating the above for the #turn_on intent and you have a chatbot that not only understands requests to turn things on and off, but would also able to perform those actions and respond accordingly! 🙌
Step 4: Respond to the user
Once we have actioned and decided our response, the final step is just sending that response back to the user through the original channel, thus completing a round of conversation. As for Step 1, we won’t focus too much on this as each platform has its detailed instructions on how to do this, but as an example, on Facebook, you’d use the messenger’s Send API to achieve this.
That’s it for Part III and our chatbot mini-series. We’ve covered everything from the chatbot landscape to the practical implementation of NLU and Dialog. In the process we created a Watson Assistant skill capable of understanding, acting and responding to requests to turn things on and off. You should now be able to take this example and explore your ideas for a chatbot.
As this is the last article of this series, we’ve included not only insights & tips related to this article but also chatbot development in general:
💡 It’s important to understand the limitations of chatbots before envisioning, designing and specifying the scope of one. NLU got a big push in recent years with the advances of machine learning but, at its core, dialog building still follows the same basic principles it would have 20 years ago. At Glazed we iterated through multiple alternatives to build chatbot dialogues but ended up developing our own Dialog Engine to give us the flexibility we needed.
💡 When designing your conversation, design the error/misunderstanding path from the start. This might seem trivial, but as you start building more complex dialog trees it will be key to have a solid fallback. No matter how well you design your chatbot, this fallback path will always be a possibility.
💡 You’ll find many services online offering all-in-one solutions for chatbot development (NLU + dialog + copy + conversation context). These are fine to get you started and smaller projects, but they might fall short for long term commitments. Over time you might want to add additional languages, deploy to additional channels, include new dialog, tweak & improve NLU sets, etc. If so make sure these things are all possible and relatively simple.
💡 If you’re a developer this goes without saying, but you’ll want to make sure your workflow enables proper version control, PRs, reviews, releases, etc… I dare you to achieve that through these service’s web tools 😬🤯
💡 Depending on the chatbot, personal information might be shared during conversations. This might be particularly hard to narrow down to specific locations in chatbots using natural language, so consider enforcing global privacy-aware logging policies (e.g. limited log access, short life span, automatic data maskers, …).
